

Hi there! I love making crafts to give to family and friends and since Halloween will soon be here... I've been really busy making all types of spooky crafts for the occasion. Today I want to share how I took a broken necklace and use it to make some fun vessels for jewelry making.

I want to share this fun and amazing product called Amazing Mold Rubber, it's so easy to use and it helps you make some very flexible molds – not to mention that this product picks up every little detail of the items you mold. Also, let me just say that when you use the Amazing Clear Cast Resin on the molds made with this product your resin pieces come out with a nice shine already – eliminates the need to add resin or another product to make it shiny, these molds will do that for you.
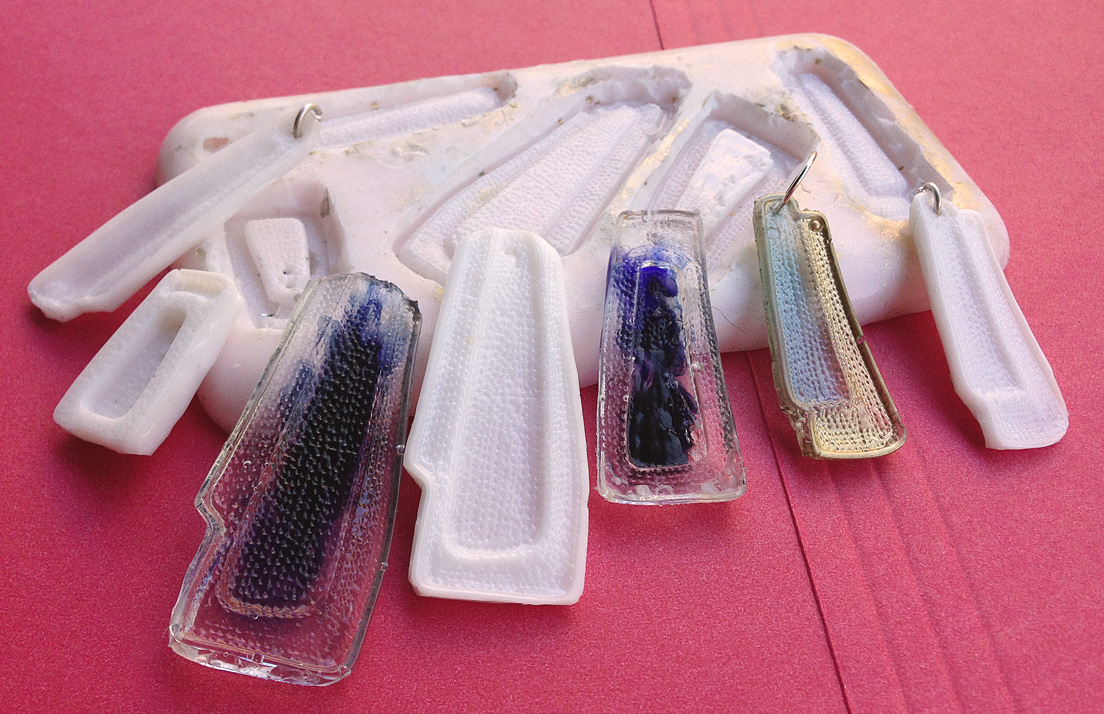
I recently got a new phone and I liked the case it came in. I figured I could use it to hold resin pieces, but also to mold small items. In this case I glued down some pieces from a broken necklace and used the mold rubber to create a few molds at once.

CLICK HERE to view mixing/preparation of Amazing Mold Rubber. Depending on the size of your mold and humidity it can take from 30 minutes to about 4 hours for your mold to cure {I leave mine overnight}.
Once the mold was ready I decided to try casting pieces in both the Amazing Clear Cast Resin and the Amazing Casting Resin, then decide which one I wanted to use. Here you can see some of the resin pieces I created. I like to work with the resin pieces when they are still soft. At this time I can add hangers to them, trim any excess resin on the edges, and once they are cured completely you can go ahead and paint them – I use acrylic paints most of the time to paint my resin pieces.

I decided that this time around I wanted to add color to my resin, so I added some Gold Alumilite Metallic Powder to the Amazing Casting Resin part "A" before adding part "B" (click here to see how to mix this product). I wanted the resin pieces to be gold for this project.
Once the resin pieces were ready, it just took some looking around to see what I would use to fill them with. I had some leftover pieces of a cut up a Halloween scarf from a previous project that I noticed these tiny skulls, so I cut them out. I took these along with fun glitter, tiny skull beads, and some sections of black fabric;p then glued everything down using Liquitex gloss medium & varnish.

Once dried, I thought at first I would use these to make some fun jewelry, by adding them to a chain, but then as I looked around I found a bag of zippers I got at a yard sale long time ago, and decided why not use one of the zippers to make a necklace instead of using wire or chain, I liked the idea and went with it, that's when I realized, why not take the other two and turn them into zipper pulls.

Most of the time it's cold during Halloween and the kids have to wear their jackets when they go out Trick-or-Treating... so why not make some spooky zipper pulls! That's what I did – two of these will be going to my youngest nephews so they can add them to their jacket's. I think one of my sisters would love to wear the zipper necklace, or maybe I'll wear it. Here are the final pieces I created, hope you like these as much as I do.

I hope to have inspired you to get crafty for the Holidays... and that you give these amazing products a try. Please make sure to share anything you make with these fun products, we would love to see your creations.

I want to share this fun and amazing product called Amazing Mold Rubber, it's so easy to use and it helps you make some very flexible molds – not to mention that this product picks up every little detail of the items you mold. Also, let me just say that when you use the Amazing Clear Cast Resin on the molds made with this product your resin pieces come out with a nice shine already – eliminates the need to add resin or another product to make it shiny, these molds will do that for you.
I recently got a new phone and I liked the case it came in. I figured I could use it to hold resin pieces, but also to mold small items. In this case I glued down some pieces from a broken necklace and used the mold rubber to create a few molds at once.
CLICK HERE to view mixing/preparation of Amazing Mold Rubber. Depending on the size of your mold and humidity it can take from 30 minutes to about 4 hours for your mold to cure {I leave mine overnight}.
Once the mold was ready I decided to try casting pieces in both the Amazing Clear Cast Resin and the Amazing Casting Resin, then decide which one I wanted to use. Here you can see some of the resin pieces I created. I like to work with the resin pieces when they are still soft. At this time I can add hangers to them, trim any excess resin on the edges, and once they are cured completely you can go ahead and paint them – I use acrylic paints most of the time to paint my resin pieces.

I decided that this time around I wanted to add color to my resin, so I added some Gold Alumilite Metallic Powder to the Amazing Casting Resin part "A" before adding part "B" (click here to see how to mix this product). I wanted the resin pieces to be gold for this project.
Once the resin pieces were ready, it just took some looking around to see what I would use to fill them with. I had some leftover pieces of a cut up a Halloween scarf from a previous project that I noticed these tiny skulls, so I cut them out. I took these along with fun glitter, tiny skull beads, and some sections of black fabric;p then glued everything down using Liquitex gloss medium & varnish.

Once dried, I thought at first I would use these to make some fun jewelry, by adding them to a chain, but then as I looked around I found a bag of zippers I got at a yard sale long time ago, and decided why not use one of the zippers to make a necklace instead of using wire or chain, I liked the idea and went with it, that's when I realized, why not take the other two and turn them into zipper pulls.
Most of the time it's cold during Halloween and the kids have to wear their jackets when they go out Trick-or-Treating... so why not make some spooky zipper pulls! That's what I did – two of these will be going to my youngest nephews so they can add them to their jacket's. I think one of my sisters would love to wear the zipper necklace, or maybe I'll wear it. Here are the final pieces I created, hope you like these as much as I do.

I hope to have inspired you to get crafty for the Holidays... and that you give these amazing products a try. Please make sure to share anything you make with these fun products, we would love to see your creations.
How do you decorate for the holidays?
Thanks for visiting! I invite you to stop over to my blog, "What is Creativity" at http://chuy-creativity.blogspot.com to see more of my creations. ~ Maria Soto
• • • • • • • • • • • • • • • • •
Don't forget to subscribe to our blog on the right side bar:
Twitter at AmazingCasting | Facebook at AmazingMoldPutty | YouTube at AmazingMoldPutty

No comments:
Post a Comment