Friday, May 30

When #Cre8time meets Willy Wonka...
AMAZING Inspiration by Cat Kerr


Greetings AMAZING Crafters! Today we welcome back our Featured Artist Cat Kerr who is sharing a some AMAZING Inspiration with us today – wrapping the Month of May up with a BOW! If you missed her How-To from last Friday... CLICK HERE to see it NOW!!!
Enjoy :) Sb

• • • • •

Using Amazing Casting Resin on embossing folders is an awesome way to add texture to all sorts of projects. Here's a small canvas with just a hint of casting texture, but I believe it speaks volumes. Inspired by movie night with my son, Willy Wonka offered inspiration.


This time I knew I would be painting over the Amazing Casting Resin texture sheet, so I didn’t mix it with any Alumilite Dye or add any Alumilite Metallic Powder. Once cured, the casting resin sheet easily came off the embossing folder.


I cut it in half, glued it onto the canvas along with telephone book text. Once the glue dried I covered the texture sheet and some of the canvas in gesso.


I added multiple layer of color...


...and rub-ons, and a vintage photo...


finished off with some antiquing, inka gold and hardware...


...and Pure Imagination was finished.


Happy Creating friends! ~ Cat


Cat Kerr is a mixed media artist/instructor that lives in Central Florida with her husband and two children. Her work has been featured in numerous publications such as Somerset Studio, Belle Armoire Jewelry, Cloth Paper Scissors, and many more. She currently teaches on-line and at national retreats around the country. To inquire about her workshops and teaching schedule, please visit her website at http://www.catkerr.com.

• • • • •

Thanks for stopping by today! We hope you enjoyed this inspiration from Cat Kerr. We want to say THANKS to Cat for joining us as our Featured Artist for May... and we hope that she'll come join us again in the future. To inquire about her workshops and teaching schedule, please visit her website at http://www.catkerr.com.

Thursday, May 29

Vintage Techniques Resurrected for Jewelry... AMAZING Inspiration by Tracy Alden


Hello! Tracy here with a inspiration post using Amazing Crafting Products. I am always trying new techniques and ways to create art, but sometimes some of the best ideas have already been tried and just need to be dusted off!

My mother, Theresa Brehm, a resin artist in her own right, had created many different ways to make beautiful resin jewelry, even adapting preexisting resin techniques of her time. As I had already noted in a previous Inspiration Post my mother had even worked with shards of opal mixed with resin. Lately my mother has been cleaning out art supplies, and one of the things she found in her collection was a 40+ year old resin inclusion kit! My mother wonder if I would be willing try out the kit with Amazing Clear Cast Resin, and of course I said yes!


The kit is simple: a jar of real white opal shards (shards smaller than a dried pea), plastic cabochon shells and instructions. The kit was designed so that one could use the tiny shards of fragile opal persevered in resin as jewelry. 

The original idea was to fill the plastic cabochons with the resin and opal shards, though my mother had already found out over 40 years ago the plastic cabochons would get scratched easily and were often too small for the opal she wanted to include. A solid resin pour was the better choice and protected the opal better as she had found out. She worked out a way to be able to pour any size cabochon in layers to control the placement of the opal and the final backing layer of resin.


So I opened up the bottle full of opals and cleaned them in water, removing any dirt or matrix still attached. I let them dry and sorted them by size and shape.


Using a cabochon mold, I started with pouring a thin layer of clear resin that settles to the bottom. It has the appearance of a lens. I let that cure until reaching a tacky set – about a few hours in warm weather. Next I poured a second thicker layer of resin and carefully place the opal shards in the resin making sure to coat them completely. The resin needs to cover the shards resting on the first poured layer. The final layer is a thin layer of resin tinted with Black Alumilite Dye.


The technique worked prefect with Amazing Clear Cast Resin!
While placing the shards of opal is time consuming, it creates a beautiful effect. 


So happy with the results, I started trying other stone shards and in this case the Pearlized Stampendous Mica Fragments Jar, from the The Frog Dog Studio April Mixed Media Kit. I did a pour with the black resin layer and one without to show you how without the back layer to the cabochon it doesn't have the same dramatic quality as those with it.


With the addition of frames, findings and jewelry embellishments,
I now have one-of-a-kind jewelry pieces! 

By trying out new (or old) techniques
what AMAZING arts and crafts can you create?

Please share them on the user GALLERY on the Amazing Mold Putty Website!

Visit my blog Art Resurrected for more craft tutorials!
Until next time, safe travels! ~ Tracy
. . . . . . . . . . . . . . . .

Don't miss a single post!
Please subscribe to our blog on the right side bar:
Twitter at @AmazingCrafting | Facebook at AmazingMoldPutty | YouTube at AmazingMoldPutty

Wednesday, May 28

An Amazing Celebration of Mixed Media...
Frog Dog Studio Design Team Recap


Hello Amazing Creatives! We just wanted to take a moment to share a recap post with all the links of the Amazing Projects created by the Frog Dog Studio Design Team from our celebration of mixed media last month. All of the wonderful projects from our Creative Team... multiplied with all the creations at Frog Dog Studio... brings countless project ideas and inspiration – the possibilities are endless!

How about an AMAZING Giveaway, too!

Please a comment below with your favorite project created shared via the inLinkz below from Frog Dog Studio. We have assembled a Mixed Media Dream Kit combining items from Frog Dog Studio and Amazing Crafting Products. Please leave a comment here by 11:59am PST on May 31st - the winner will be announced on June 1st. If you have won any of our previous giveaways... you know that our prize packages are truly AMAZING!


.................................


We are excited to announce Frog Dog Studio – as our new partner "in crafting". This creative collaboration opens the door WIDE open to many new and exciting projects utilizing both Amazing Crafting Products products and the great supplies found at FrogDogStudio.com including their monthly mixed media kits. Our goal is to inspire you to create with us... as we all have FUN "in the making!"

Have a creative day!  Sb :)
...........................................

Don't miss a single post!
Please subscribe to our blog on the right side bar:
Twitter at @AmazingCrafting | Facebook at AmazingMoldPutty | YouTube at AmazingMoldPutty

Tuesday, May 27

If You Give an Artist Some Sunshine...
AMAZING Inspiration with Rachel Whetzel

Hello, Creatives!! Rachel Whetzel, here, with a little vintage patriotic fun! I'm sure I'm not the only artist whose inspiration sometimes comes in an A.D.D. kind of mind stream. The kind that resembles the book If You Give a Moose a Muffin. For me it goes like this: The sun starts to come out, the fire pits gets it's first fire of the season, and I start thinking about Summer. Thinking about Summer makes me start to think about BBQ's. Thinking about BBQ's gets me thinking about my garden. Thinking about my garden gets me thinking about fresh fruit. Thinking about fresh fruit makes me start planning which one's I'll pick, like blueberries and strawberries. I like to dip them in whipped cream. Thinking about eating strawberries and blueberries dipped in whipped cream gets me all red white and blue, which reminds me of the 4th of July. Thinking about the 4th of July reminds me of BBQ's, and I decide I might make invitations to a BBQ on the 4th this year... and so I begin. 
I have a vintage pin that says U.S. on it,
and that's where I jumped off for this project. 


After molding the pin, I used Amazing Casting Resin with Bronze and Gold Metallic Powders to create the metal finish of the pin! I also had some vintage red white and blue crepe paper streamer that I used to back the pin.


Here's the finished invitation!! I really love the way these turned out, and how simple and easy it was to create them! I think I might use these pieces to create some patriotic banners too! I especially love that my "I-only-have-one" piece has now turned into an "I-have-as-many-as-I-want!" piece, thanks to Amazing Crafting Products


Now tell the truth... Am I the only
person whose muse takes them 
on this twisted path to creation!? 

Thank you for reading! Want to see more of what I'm up to?
Visit me on PINTEREST and INSTAGRAM, or like MY PAGE on Facebook!
Thanks for stopping by! ~ rachel

• • • • • • • • • • • • • •

Don't forget to subscribe to our blog on the right side bar:
Twitter at AmazingCrafting | Facebook at AmazingMoldPutty | YouTube at AmazingMoldPutty

Monday, May 26

#Cre8time Magic... Making a Fairy Garden Birdhouse using Amazing Mold Rubber


Hello Amazing Crafters! Susan here for another Mold Rubber Monday. Today I am sharing another project using Amazing Mold Rubber... one that is a bit whimsical and magical – and perfect to adorn a fairy garden.


Amazing Mold Rubber comes in 2 parts – a Rubber Base and the Catalyst. I have prepared several items to mold so I am mixing up the entire container. I find it easier always mix the entire container and pour several items to mold simultaneously – then nothing goes to waste and cleanup is a breeze. Amazing Mold Rubber will completely fuse to itself, so if you run out mid-pour, you can let it cure and fill the rest with another batch later.


For today's project – I have an assortment of acorns and caps in varying sizes and some other findings to mold in Amazing Mold Rubber.


Using hot glue, I mounted the items into a metal tin lid. The larger caps I placed craft foam in the center then adered so I could mold all the way to the edge of each.


Then I added a cylinder of cardstock and taped to the tin lid to form the mold box walls. I will need to fully cover the items in Amazing Mold Rubber about a 1/4" over the height of the items.


I secured the paper wall of mold box to tin with scotch tape.


To mix the entire container of Amazing Mold Rubber is simple. Peel back the protective seal on the Rubber Base and then pour the entire bottle of Catalyst into the rubber base. Stir gently and completely until there is no swirling and the catalyst is completely incorporated into the rubber base. The color will be a light bubble gum pink. I use a plastic knife from take out to stir – as the back edge is flat which can be used to scrape the edges completely when mixing.


When completely mixed, pour the Amazing Mold Rubber into the mold – gently letting the liquid silicone flow around and fill in around the objects.


I filled the mold box about 1/4" over the items with the AMR, leaving the longer stems a bit visable - but this is OK as they are fairly long and it won't affect the outcome when I cast in resin later on. I poured the remaining Amazing Mold Rubber into other prepared mold boxes. I set the molds aside to cure for a few hours. I generally pour molds in the AM before I head out to work and they are ready when I come home later in the day.


I tore away the paper edging and gently peeled the acorns, caps and other findings from the mold. Now I have many new items ready to customize and cast in Amazing Casting Resin.


Now the fun part... coloring and casting! With a paintbrush I applied a variety of Alumidust colors directly into the mold, then filled with a prepared batch of Amazing Casting Resin {CLICK HERE to view preparation}. In about 10 minutes, my acorn base and cap are cured and ready for embellishment.


I added a section of fiber around the cap and adhered to the acorn base. I drilled a small hole in the top and the base of the acorn to accept wire wrapped stem and coils to stand in a planter – held in place with a dot of adhesive. The finishing touch is a hole painted on with an enamel paint pen to bring this fairy garden birdhouse to life.


What items would you mold to create
items for your fairy garden?

If you would like to see more of my creations, please visit my blog
sbartist : painting in the dark by clicking here. ~ Susan

I hope you have a creative day - thanks for visiting!
See you tomorrow with more Amazing Crafting Products inspiration.

• • • • • • • • • • • • • •

Don't forget to subscribe to our blog on the right side bar:
Twitter at AmazingCrafting | Facebook at AmazingMoldPutty | YouTube at AmazingMoldPutty

Saturday, May 24

Celebrating Birthday LOVE for the 5th Annual Operation Write Home Memorial Day Bloghop


Welcome to Amazing Crafting Products and our stop on the Annual Operation Write Home Memorial Day Bloghop! We would like to say "THANKS" to our men and women serving in the armed forces. Each one of us has a family member, friend or co-worker that has dedicated their life to protect our freedoms and to these brave folks we say "THANK YOU!" Also we would like to say "thanks" to all who support Operation Write Home in providing millions of handmade cards to our Military Men and Women abroad.


If you arrived here and would like to get back to see the rest of the blogs participating... CLICK HERE to head back to Operation Write Home!


BLOG CANDY...

As part of the event, Amazing Crafting Products is hosting a giveaway of AMAZING proportions. One winner will be chosen from those who leave a comment telling us "what is your favorite embossing folder technique" on this post. Winner will receive one box each of Amazing Mold Putty, Amazing Mold Rubber, Amazing Clear Cast Resin and Amazing Casting Resin!!!


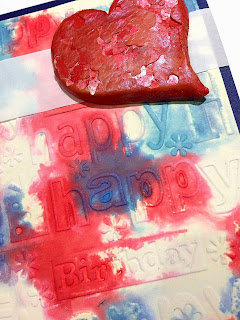
Cardmaking is quick and easy with embossing folders and we particularly love them for making our own embellishments with Amazing Crafting Products. In the Happy Birthday with Love card, designer Susan M. Brown applied Ranger Distress Stains into the Cuttlebug Happy Birthday collage embossing folder, placed in a natural cardstock and ran through the Cuttlebug to make a quick and easy background. To finish off the card she added a dimensional heart molded in Amazing Mold Putty; then cast with Amazing Casting Resin, Red Plum Alumidust and Stampendous Mica Flakes.


To make the heart coordinate with the card base, she rubbed the resin heart with Liquitex Pyrrole Red Acrylic Ink. It gives that pop of red, but lets the shimmer of the mica flakes shine though. Mounted on a navy blue card base, this card is colorful with texture and a little dimension, too!

For more AMAZING ideas creating embellishments with Amazing Casting Resin and embossing folders CLICK HERE or scroll down to yesterday's post by our Featured Artist for May, Cat Kerr. This is a MUST SEE and worth an extra minute before you hop along!!

. . . . . . . . . . . . . . . . . . . . . . . . . . . . . . . . . . . . . . . . . . . 

Now we have a little business to take care of... Last year we participated in the Annual Operation Write Home Memorial Day Bloghop and the OUR PRIZE was never claimed. If you missed out on it, CLICK HERE to see all the stops on the hop. Thanks so much to all the supporters of OWH and all the fantastic readers who dropped by to visit as part of this fabulous event. We drew a number via random.org from the 106 comments left and the winner is... DRUMROLL please....


Congratulations to April!!!!


Please email Susan Brown, Creative Team Coordinator your shipping info where you can receive FedEx Ground packages so we can send out your prize to the following email:


. . . . . . . . . . . . . . . . . . . . . . . . . . . . . . . . . . . . . . . . . . . 

Have a Safe and Happy Memorial Day Weekend!


Don't forget to subscribe to our blog on the right side bar:
Twitter at AmazingCrafting | Facebook at AmazingMoldPutty | YouTube at AmazingMoldPutty
Related Posts Plugin for WordPress, Blogger...