Sunday, May 27

Star Spangled Magnets using Amazing Casting Resin and Alumilite Metallic Powders

Happy Memorial Day!!! Hope you are enjoying your holiday weekend. Susan here to share another adventure with Amazing Mold Putty. Today I am sharing a "Star Spangled" project using Amazing Crafting Products by Alumilite Corp. And I also have a  special Amazing Crafting Products coupon for you too!


It just happened that I have created some star shaped magnets that were super easy to make using a star shaped ice cube tray {which was never going to be used to make ice}. SO for this project I am featuring Amazing Casting Resin colored with various Alumilite Metallic Powders. 


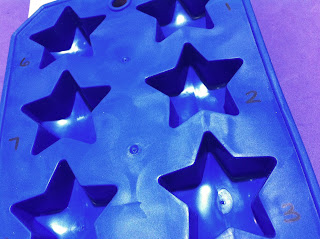
It's no secret that I'm a fan of stores that are of the dollar and tree variety. I always find something fun to create with there. I recently picked up a star shaped ice cube tray which seemed perfect to make some star shaped embellishments using the Amazing Clear Cast and Casting Resins.

Then with a permanent marker I labeled each star. This mold has ten star molds. Why do I need to number them??? Well, the short answer: for the purpose of experimentation and so I can remember what I did. I figured it would be a fun way to test out all the metallic colors.


Then I gathered my collection of Alumilite Metallic Powders. I have six colors: Gold Metallic, Silver Metallic, Copper Metallic, Gun Metal Metallic, Pearlescent and Bronze Metallic Powders. When I was at CHA Winter this past January at the Amazing Mold Putty booth, I learned that more colors are in development, too...YAY! I've used the Gold Metallic and the Gunmetal on my Steampunk Eggship and Wishbone Casted Charm projects {please click the names to go to the post}.


So back to why I labeled the tray - this started out as an experiment to just see how each metallic powder came out. Who can't use an extra star here or there? For each star I dusted one of the metallic powders and wrote them on a note pad with corresponding number. This left me with 4 empty stars. For these I dusted the mold with some perfect pearls to see what happens (red, purple, blue and green).


  Completed dusted mold ready for resin pour.

Now for the FUN to BEGIN! Time to get out my Amazing Casting Resin!


Please see accompanying image number to go along
with written instruction/description.


Photo(s) #1: Following the directions on the package I measure out to equal parts of Part A and Part B to mix Amazing Casting Resin which sets up in approximately 10 minutes. Both parts of the resin pour out clear. Photo #2: Combine both parts "A" and "B" and stir thoroughly and quickly - Amazing Casting Resin sets up quickly. Photo #3: I poured resin into each star shape of the mold.   The batch of resin only gave me enough to fill each about 2/3 with resin. Photo #4: Amazing Casting Resin as it reaches the flash point and turns from clear to opaque white. Once it turns white it is hardened. After about 10 minutes I can remove these from molds. Photo #5: I had a "bright idea"!!! I can make some magnets. I had a pack of 10 magnets just sitting in the junk drawer. Can you believe I actually started out thinking..."oh I'll just glue the magnets on the back"???

Then after I set one magnet in the center of each star, I had an AMAZING idea!!!
Pour more Amazing Casting Resin around them to embed the magnet into the star!!!

 Close-up of second layer of Amazing Casting Resin over first cured pour.

Completed cured resin after second pour.

I also wrote the number on the back of each star for my corresponding color list.
Now I can remove them from the mold and I am so excited to see the results!

Not all of the magnets look pretty on the back. A couple have some resin over lapping the magnet edge - but they do work. The Alumilite Metallic Powders look like real metal and the pearlescent is a beautiful pearly white. The perfect pearls unfortunately didn't turn out the same - the colors became watered down from the wetness of the resin resulting in an interesting muted color effect. Also, since I didn't brush the metallic powders all the way to the top of the mold, the stars have a nice blended two-tone effect on the edges of the stars from the double pour. Next time I will try mixing the colored powders directly into the resin. This was a fun project and now I have some custom magnets to use in my studio. I plan on making some custom pushpins, too.

Presenting my "Super-Star Magnets".


I hope you enjoyed today's project. I encourage you to take some time to explore and search through the many AMAZING projects from my fellow Amazing Mold Putty Design Team members. There are so many great tips and ideas!


Use coupon code AMP20 to receive 20% off your order.
Coupon expires - Sept 30, 2012

If you have any questions, please leave a comment, select receive e-mail follow ups on comments and I will respond. If you would like to see more of my creations, please visit my blog sbartist : painting in the dark by clicking here.

Happy Crafting : )

Thursday, May 24

Flower Headband


1.  Materials:
Amazing Mold Putty
Amazing Quick Cast Resin
Something to mold
Alumilite's Black Dye
Alumilite's Gun Powder Mica Powder
Terri Sproul Mixers Pink Sapphire and Ultra Fine Glitter
3D Crystal Lacquer
Headband
Ribbon
Hot Glue Gun/Sticks

2.  Take equal parts A and B of Amazing Mold Putty.

3.  Mix throughly (my daughter calls this the smashing part)

4.  Press item into mold - allow to set for 5-10 minutes

5.  Un-mold item.  Brush glitter into mold.

6.  Brush mold with Mica Powder (over the glitter)

7.  Take Quick Cast measure equal parts A and B.  Add one drop of dye to part A, mix throughly.

8.  Add part A and B together.  Mix throughly.

9.  Pour into mold.  Allow to set for 5-10 minutes

10.  Un-mold the piece.

11.  Paint piece - I used 3D Crystal Lacquer and Terri Sproul Mixers.

12.  Wrap plastic headband with ribbon, secure end with hot glue.  Hot glue flower to the headband.

Find a Princess to mold her new headband!


Tuesday, May 22

Charlotte

Hi everybody, it's Edie,


A few weeks ago I found an little, armless, vintage doll at a yard sale. I brought her home and stuck her in my box of ephemera to await her chance to be molded. I had never made a two part mold before and to be honest, I was kind of intimidated by the whole idea. I was worried about it leaking, not lining up properly and just not turning out right in general. Thank goodness Amazing Mold Putty has fantastic tutorials on their website, because my first two part mold turned out FANTASTIC! I followed the instructions I had seen on the site and it was sooooo simple! You can view the full (time lapse) video tutorial below or you can view the full (real time) Ustream episode full of tips and viewer questions and answers.


 I made the first half of my mold, covered the front side of my doll, making sure to stop at the seam line. While it was still moldable, I used the end of a paint brush to create markers on the outside edge. This will help to ensure my mold lines up properly every time. I let the first half set completely before moving on. I gave the seam line and all of the nooks and crannies a coat of Vaseline, but you can use what ever mold release you like. It is extremely important to cover ALL of the areas the Amazing Mold Putty might connect because it will adhere to it's self. I mixed up the second half of my mold and covered the back side of my doll, making sure to push the Putty into all of the earlier mentioned nooks and crannies ;) Once my mold was completely set, I removed my original doll and started preparing my mold for casting. I knew I would be using this mold with Amazing Casting Resin and the Amazing Clear cast, so I cut some little vents in the bottom to allow air bubbles escape. I wrapped a rubber band around the mold, put it upside down in a cup and added paper around the bottom to hold the mold upright. Next, I mixed up some Amazing Casting Resin, poured it into my little air holes and let it set. Even though it is not technically a 'Frozen Charlotte" doll, that is what my cast doll reminded me of and I ♪♫LOVE♪♫ it! I trimmed away the excess resin (do this BEFORE the item is completely set) and sanded her in a few spots. Amazing casting Resin is basically a hard, shiny plastic, so I gessoed my cast doll before I painted her. I mixed some gum arabic into my PearlEx powder for a binder and added water to create my base paint, then I used Iridescent Pearl craft paint on her face, belly and legs for highlight.


I created the wings with a piece of transparency paper. I painted on a basic wing shape for a guide, then I cut two pieces of wire and super glued them into place. For the outline of the wings I added a line of glue and sprinkled on some blue microbeads. I painted the inside of her wings with copper acrylic craft pain and tapped the paint for texture. Once the paint was dry I stamped them with Distress Ink. I made little holes in the wings by pushing a lit incense stick thought the transparency sheet. I love how these wings turned out and I plan on using them on another project that allows them to stick out :D I got the basic idea for these wings from Terri Sproul and you can see what she did here.


While that was drying I worked on the background canvas. I painted an 8 X 10 canvas board with black craft paint. I then stamped it with archival ink and embossed the stamped images with black embossing powder. Lastly, I attached the wings and the doll to the canvas with E-6000 glue.

 Even though she isn't a "Frozen Charlotte", she's still Charlotte to me :)
You can view more of my work on my blog.


Saturday, May 19

Faerie Wall Hanging with Amazing Mold Putty

I am always amazed when I see people mold big items with Amazing Mold Putty and thought I have to try it this month. I had found a Fairies statue at the store that I loved and want to put outside. When I started with the molding of the statue the leg broke off and I had to think..ok... NOW what? SO I molded the piece with the broken foot and after that I poured the delicious Clear resin in. When it came out I had to cut the foot off which I did using a serrated knife and it cut right off. I also gave a quick sanding to smooth out the bottom. I made a video to show you how I altered the Mold putty product and even fixed a hole that a little resin was coming through. Once the resin got cured, which was within 5 minutes, I then took it out of the mold. I have made a couple videos of this while doing it so you can see there are no mistakes that aren't fixable with this product! Once I got the piece out of the mold I then gessoed it. You do not have to gesso your product before painting but I did this time because I am going to hang it and wanted to see what it was like. I then painted it, put a coat of iridescent glitter on it and then coated it with the delicious 3d Crystal Lacquer. This will be hanging on my wall in my Art Room as good luck for me and the real one will go outside. It was going to be the other way around but since the foot broke, she will sit in the garden. This product is such an amazing product and so flexible that you can be so free while using it and not worry....most things are fixable! Here is a coupon for you to try this product and see for yourself!
Don't forget www.alumilite.com  has a 20% off discount available - use code AMP20

Wednesday, May 16

Butterfly Pendant Necklace


Hi everyone! I hope you are enjoying your early summer weather! Here on the Amazing Mold Putty Blog, I thought tit would be fun to make this pretty Butterfly Pendant Necklace!


I started with a clean butterfly rubber stamp. Then I took equal amounts of yellow and white Amazing Mold Putty and mixed them together.


I kneaded the putty with my fingers until there was no trace of white.


Then, instead of pushing the stamp into the putty, I formed the Amazing Mold Putty into a square shape and placed it onto the stamp, pushing in with my fingers until I was certain I had filled in the butterfly stamp. I pulled the extra bits of the putty down onto the sides of the rubber stamp to create a sort of cavity when the mold would be released.


Once the putty had set, about 15 minutes or so, I popped out the stamp.


Next I applied with a dry brush, Silver Alumilite Metalic Powder to the inside of the mold. 


Then with the Amazing Casting Resin, I poured 2 oz of each "A" and "B", using the supplied measuring cups and mixed it into a paper dixie cup. 


I stirred the mixture until it became clear then poured it from the paper cup into the butterfly mold. Warmer days, and your resin will set faster, 10 minutes or less. When I made this, it was still chilly in the morning, and working with my studio window open, made the set time almost 20 minutes.


Once the resin cured, I popped out the butterfly. Working quickly while it was not yet permanently hard, I used precision scissors to trim off any excess Amazing Casting Resin I did not want in the finished piece.


For the back of the butterfly, you don't always need fancy bails. Here I used metal photo corner mounts from my scrapbooking stash and applied them with E-6000 glue.


I measured a piece of silver chain, long enough to fit over my head and attached the ends to the photo corner mounts with jump rings. I accented the butterfly detail with fine silver glitter, coated it with a sealer and attached a piece of vintage rhinestone trim with more of the E-6000.


I hope I have inspired you to make something like this. It's really easy and beautiful to show off.

Thanks for coming by, see you next month!

Sunday, May 13

Amazing Mold Putty Napkin Rings

Never before have I had so much fun working with a single product than The Amazing Mold Putty!

However the path to getting this project posted has been very difficult indeed. I did these napkin rings well over a month ago......my laptop broke, with all of my photos and video of this project on it. Fast forward to this weekend. As I was putting together another video of this project.....my little video camera sizzled and fried out! So I tried my camera.....the batteries ran out before my video did. So I moved onto the computer camera and a direct load to youtube, ok so things got better....but wouldn't you know it, youtube didn't load the last four minutes of video....leaving out the most important part of the process. Now I know this project isn't meant to be....but here it is anyway!!
I hope you will enjoy it anyway.


Supplies:
- Amazing Mold Putty
- Clear Clasting Resin
-Terri Sproul 3D lacquer and mixers
- beads
- two mixing pots, a brush, paint tray and mixing stick

Step 1
Make your mold by combining equal parts of A and B, of the Amazing Mold Putty together into a ball.

 Combine these two puttys to form one solid putty as shown below.
Step 2
Lay out the mold putty into a strip equal in dimension to that of your embossing template, Roll out flat until about 1/4 " thick and  6" long. Press embossing folder into the mold putty. Remember to roll up the edges to keep your resin inside the mold.


Step 3
Mix equal parts of A & B of the Amazing Casting Resin, combine, stir and pour into your mold.


Step 4

Allow your mold to set up for about 10 minutes. Remove mold while still pliable from the yellow mold putty and form into a circle. If you are worried it won't stay in the circle shape, wrap a piece of cardboard around the resin and tape around the ring as shown below.


Step 5

Paint your napkin ring with 3D Crystal Lacuer and Terri Sproul Mixers. Let dry, clamp ring if required. Add the resin bird embellishment with the 3D lacquer.


I wish you could see the whole video, however that just wasn't in the cards this time around. I can't wait to get my old computer back from repair. But here is the napkin ring video I did get.


I hope you will give these products a try, as they are extremely easy to work with!

Don't forget www.alumilite.com  has a 20% off discount available - use code AMP20

Wednesday, May 9

Made with Love....

Hello AMP fans.

Today I want to share a cross that I made for my niece for her First Communion. I found this cast iron cross at the swap meet and thought it was beautiful, but it didn't look like something a young lady would want to hang in her room.

So I thought I would make a mold of it using Amazing Mold Putty,
and then make it into something a little girl would love.

After molding it I mixed the two part Amazing Casting Resin with just a drop of Alumilite Red Dye in it to turn it this great shade of pink...(one of her favorite colors.) I also brushed the mold with Alumilite Pearlescent Powder to give it a shimmery look.


After it set up. I took it out and sanded the edges a bit to make sure they where smooth.


I added some ribbons and crystals to it...I love how it turned out.


And by the look on her face I think she Loved it too.

Thanks for stopping by today to see my made with love cross. Check back often.

Hugs~~
Molly
Related Posts Plugin for WordPress, Blogger...