Monday, April 30

An Unusual Paperweight Made Using Amazing Mold Putty and Amazing Casting Resin!!

Sometime ago I picked up a liquid soap dispenser in a thrift store that was shaped like a lady’s shoe. I thought it looked awesome and had the idea that it would also look good as a paperweight! Now wouldn’t that be unusual and quirky perched on your desk at work?


And so the fun begins! First off I mixed equal amounts of Parts "A" and "B" of the Amazing Mold Putty. After kneading the putty until it was completely blended, I molded the putty around the shoe as far as it would go. I then repeated the process with more putty and finished molding the shoe.


Looks pretty bad at this point doesn’t it?


I then mixed up equal parts of the Amazing Casting Resin and added some Alumilite Blue Dye to it. Because the mold is slanted, it took several pours to get the mold completely filled.


Once the mold was set up I popped it out of the mold and here it is:


How cool is that???? The main reason for the blue is to give the project a colored background. I trimmed up the Amazing Casting Resin piece and then sprayed it with some Krylon Glitter Blast. Once that was dry I added a few embellishments and here’s the finished project:


The pictures don’t even begin to show just how glittery the Krylon glitter blast is. I was really pleasantly surprised at what an easy job it was to make the mold and pour the resin. I thought I would have resin everywhere because I had to do four small pours to fill the shoe but it was a breeze because the resin sets up so quickly. Here’s some other shots:


This paperweight would make a sweet gift for someone but I think I’ll keep this one and now I have a mold to make others! You need to try this stuff, because I know you’ll like it!

~ Barbara

Friday, April 27

Frame Fragments

Hello! I'm Rachel Whetzel. I'm so excited to be sharing for the first time here on the Amazing Mold Putty® blog!! Let me introduce myself a bit before I share my project with you...
I am a mixed media artist and doll maker. (Among a billionty other things! lol)
When I first saw Amazing Mold Putty®, I just KNEW that it would fit into my mixed media art and doll making. All of my pieces contain some form of thrifted, vintage treasure from my vast collection of collections.
You know. Because when you find something you like, you need to collect more than one of them... right?
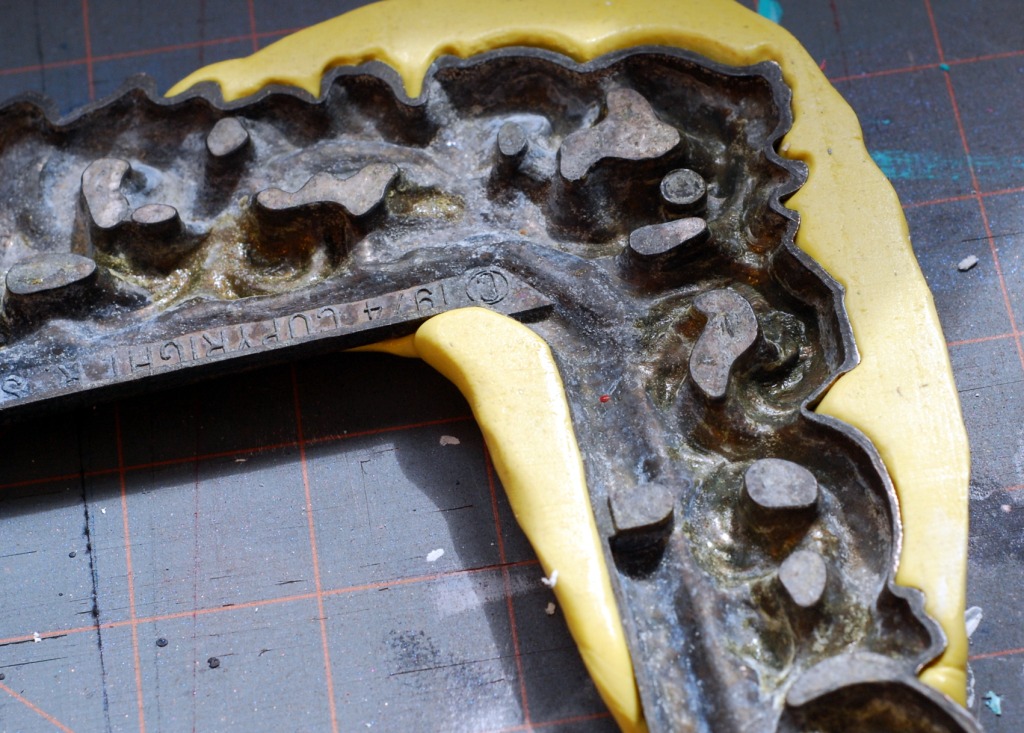
For the piece I'm sharing today, I used one of my very favorite metal frames from my metal frame collection.
My favorite metal frame
The problem is... I love this frame. I used to have two. I used one of them in a piece of art, which I love. So now, I have one left. You see where this is going? I've been avoiding using the second frame, because I didn't want to NOT have it to use any more. If you're an artist or a collector, I don't need to explain how THAT works in a person's mind.
ENTER
Amazing Mold Putty®!! 
Can you hear the angels singing?

 Supplies you'll need:
First, I used equal parts mold putty A and B and mixed them together in my hands until they were a uniform color yellow. (no white/yellow stripes)  Then I molded the putty over the corner of the frame I was going to use. My frame is large, and my art piece was not going to be, so I only molded a portion of the frame, and created a frame "fragment" of sorts for my art piece.
 Here's the backside of the frame with putty around it.
 Once I allowed the putty time to cure, I pulled it off of my frame.
 Because I was only making a fragment of the frame, and since that made the edges of the mold too shallow for resin to stay in, I added a small lip to the ends of the fragment to help hold in the resin when I poured it. That's actually one of the neat things about Amazing Mold Putty. You can go in and add to previously cured parts of a mold!! That's what I did here.
 Next, I used equal parts of the Amazing Casting Resin, mixed them together, and poured that into the mold. Here's a photo of the resin in mid cure. It's pretty neat to watch it turn white as it cures.
 Once the resin was hard, but not totally cured, I pulled it from the mold and trimmed sharp edges. I also sanded out the holes in the frame piece. I'm sure this can be done on a fully cured piece, but doing it on an only slightly cured piece seems to be easier.
 Next, I painted my piece with a metallic paint. I painted a few coats to make sure I covered the resin thoroughly. After that paint was dry, I added dimension and age by painting a dark paint over the whole piece, and wiping off the top layer. I left the dark paint in the crevices of the piece.
 Next, I got to work on my background piece. The base is an oval piece of glass I've had just waiting for a new life for a while now. I painted stripes on the back, glued map pages to it, and then spray painted lace and doilies on it.
 Dribbled paint, and splatters added. I glued the frame fragment and other bits and pieces to the glass, and added a line from one of my son's favorite songs to it.
 Close up of the frame fragment and all it's finery... Now I can use and use and RE USE my favorite frame without having to worry about not having it to use anymore!!
Thanks so much for coming along with me on this project!! Be sure to share any projects you make using ideas like this on the Amazing Mold Putty® Facebook Page!!
I'd also love it if you visit me at "my house"!!

Tuesday, April 24

Penny Coasters

By Amanda Marks


1.  Materials: Pennies, Amazing Clear Cast Resin, Coffee Lid, Copper Mica Powder
2.  Line the coffee lid with pennies.
3.  Mix resin according to package and pour the resin.
4.  A shot of the resin curing.
5.  I added a little bit of Copper Mica Powder to the top just for intrest.  Allow to dry undisturbed for 24- 48 hours un-mold.


Amazing Mold Putty Pendants

WOW! My first Amazing Mold Putty® design team post! I am absolutely THRILLED to be a part of this design team because I LOVE this stuff.

 For my first post I have two projects to share with you.They look very different but the process was the same.

It started when my son found a four leaf clover in our back yard. We wanted a way to preserve it and keep it green, but we also wanted to be able to see the whole cover from both sides. Amazing Mold Putty® and Amazing Clear Cast® to the rescue!!!

 FRONT
 

 BACK
 

I already had a mold for a clock face that my son loved and wanted his clover preserved in, so I mixed up equal amounts of Part A and Part B of my Amazing Clear Cast® and poured it into the mold. After it was set I placed the clover in the center and then filled the well with Mod Podge Dimensional Magic to seal the clover. The best part is that the clover can be seen from both sides and it is preserved forever. I think it’s very cool that my son will have a four leaf clover that he can keep for the rest of his life.


Notice how the light glints of of the Clear Cast :D

The second project is a pendant that I made using the same basic process bit with a few variations.

I had a package of those cheapy "make it yourself" pendants and I refused to use the last one because it was the LAST ONE. I mixed up equal amounts of Part A and Part B of my Amazing Mold Putty and before you know it, I wasn’t down to my last one!


I planned on painting this pendant, so instead of the Amazing Clear Cast® I used my Amazing Casting resin® with dries white and opaque. Once my mold was set I painted it black and then covered the inside background with some bits of scrapbook paper and sheet music, then painted the entire inside with Neocolor II water soluble wax pastels.


While that was drying, I drew a little whimsy face and colored her with Prismacolor colored pencils. I also made a paper flower, but it ended up being much too big for the pendant.


I cut out my girl and glued her into the pendant and then I added some glitter and placed a tiny silk flower in her hair. I added some collage with the words “It’s what I do” then I filled the well with Mod Podge Dimensional Magic and let it set overnight.


Now when someone asks me what I do, whether they are asking about work, pleasure or artistic style, I can simply show them my pendant I hope you enjoyed this tutorial. You can view more of my work on my blog.

Friday, April 20

Keeping Childrens Art


HI Everyone! I am so honored to be posting my very first project for the Amazing Mold Putty and Amazing Casting Resin Design Team. I have been using this product for a long time and love the versatility it has and how much you can think out of the box and try it....AND it works!
My first project is dear to my heart. Over the years my kids have brought home so many projects from school. This project is inspired by my daughters Tea Cup she made. I made a video but will walk you through the parts I did not record.
First I mixed the putty together in equal parts and kinda flattened it out and then pushed the front part of cup in and let sit for 15-20 minutes to form and dry.
When it was dry I added I rolled equal parts of putty to put around the outside to make sure Resin didn't run out too much. The fun thing is you can keep adding to it even after dry!!!!
I then mixed the Resin in equal parts and stirred for a couple minutes and poured into the mold.
It is fine if it runs out a bit because you can cut the extra bits off!!!! Now the rest I did on video which is right here to watch!  I hope you enjoy and please try these products!!!!

 You will start to look at everyday things........a whole different way!!!!! This is before Sakura Crystal Laquer!!!!  Have a great day!


And here it is with Sakura Crystal Laquer-All done! I am going to make it a pin! I love it!!!!!!


Monday, April 16

Pewter Rose Ring


Hi Everyone, Michelle here with my first post for the Amazing Mold Putty blog!
I'm very excited and honored to be here!
For today's project, I wanted to recreate a pewter ring I used to wear in High School.
Many many years ago :)
  In the above photo, the original is on the left, and the new ring is on the right.

The first thing I did was gather equal amounts of the white and yellow  Amazing Mold Putty.
I used a square of wax paper on a paper plate as my work surface.
Then I swirled the  Amazing Mold Putty together and mixed it quickly with my fingers until it was a uniform color of yellow.  I rolled it into a ball and pressed my ring into the putty. This set in exactly 15 minutes.
Out popped my ring and I was left with a perfect impression of the rose.
If your mold is larger, Amazing Casting Resin will generally create it's own heat during the set process.
Because my mold was so small, I put it in the microwave for 1 minute on high to preheat it.
I mixed equal amounts of the Amazing Casting Resin into the measuring cups provided and them poured them together into a paper cup. (You want to use only paper for the cup because of the way the resin heats up and that you need the lip of the cup to crease into a perfect pour spout for your mold).
It takes about 30 seconds to mix the resin with a provided Popsicle stick and then you have exactly 1 minute to pour it into your mold. In the (above) photo you can see the just poured resin, the next photo is the same resin after 10 minutes.

 After the resin had set, I popped out my flower and painted it with a mixture of gun metal mica powder and 3D crystal lacquer. I used E6000 to adhere a ring blank to the back of the rose.

Ring modeled by my friend Kaneka, :)
 And now I have a duplicate and better fitting Rose ring! Pretty close to the original, don't you think?

Thanks for coming by and seeing my creation.  While you are here, please browse around and see the other Amazing Mold Putty design teams creations!

Friday, April 13

If Faberge can do it.....So can we!!

This is the start of my new adventure with the Amazing Mold Putty Team and I couldn't be more excited to share my first project with all of you.
Now many of you probably don't know this, but May is National Egg Month, there's a surprise, cause I really thought April would be the month to celebrate this! LOL
And when I think of eggs, the one EGG aficionado that comes to mind first and for obvious "blingy" reasons would be the HOUSE OF FABERGE.
Now if you are anything like me, you too aren't likely gonna be wearing anything from Faberge anytime soon...BUT...you know the old saying "fake it til you make it"?
Well today we are gonna "MAKE IT TIL WE MAKE IT"

Lets get busy creating our very own FAKERGE EGG!


First lets watch the video - it will amaze you just how easy this is!!


Now are you ready to create your own FAKERGE EGG??

SUPPLIES:


- Amazing Casting Resin (parts A & B)
- four small mixing pots
- mixing stick
- one large and one small plastic egg
- one hinge
- rub-ons, paint, flowers, decoupage

Step 1 - place and tape the LARGE egg halves to each container, so that it sits square and balanced in the pot. You should have both halves of the large egg taped to the little pots.


Step 2 - Measure equal parts of the amazing casting resin, combine and mix until clear.


Step 3 - Pour half of the resin mixture into one half of the egg and pour the other half of the resin in the other half of the egg.
Step 4. Place the smaller blue eggs inside (right on top of the resin you just poured). And weight it down with some marbles or glass beads. Make sure there is about 1/4" of space between the yellow and the blue egg.


Step 5 - Let the resin set-up (mixture will turn white and hard after about 10-15 mins. Carefully squeeze the egg all around this will help release the mold.

Step 6 - Paint and embellish as desired, set hinge.

Without a doubt I will be making alot more of these beautiful eggs, as I would like to get alot more creative with my finished design, but I didn't think this was a bad first "crack" at it!
Happy National Egg Month!

www.createalways.com
Related Posts Plugin for WordPress, Blogger...